 "yitznewton" (yitznewton)
05/02/2016 at 16:10 • Filed to: car care
 1
1
 20
20|
"yitznewton" (yitznewton)
05/02/2016 at 16:10 • Filed to: car care | 1
| 20 |
Back in March,
!!!error: Indecipherable SUB-paragraph formatting!!!
based on my experience with our minivan. This week I finally got around to doing the second one on the S2000. Her name is Tintaglia, after a silver-blue dragon; hence the title of this post.
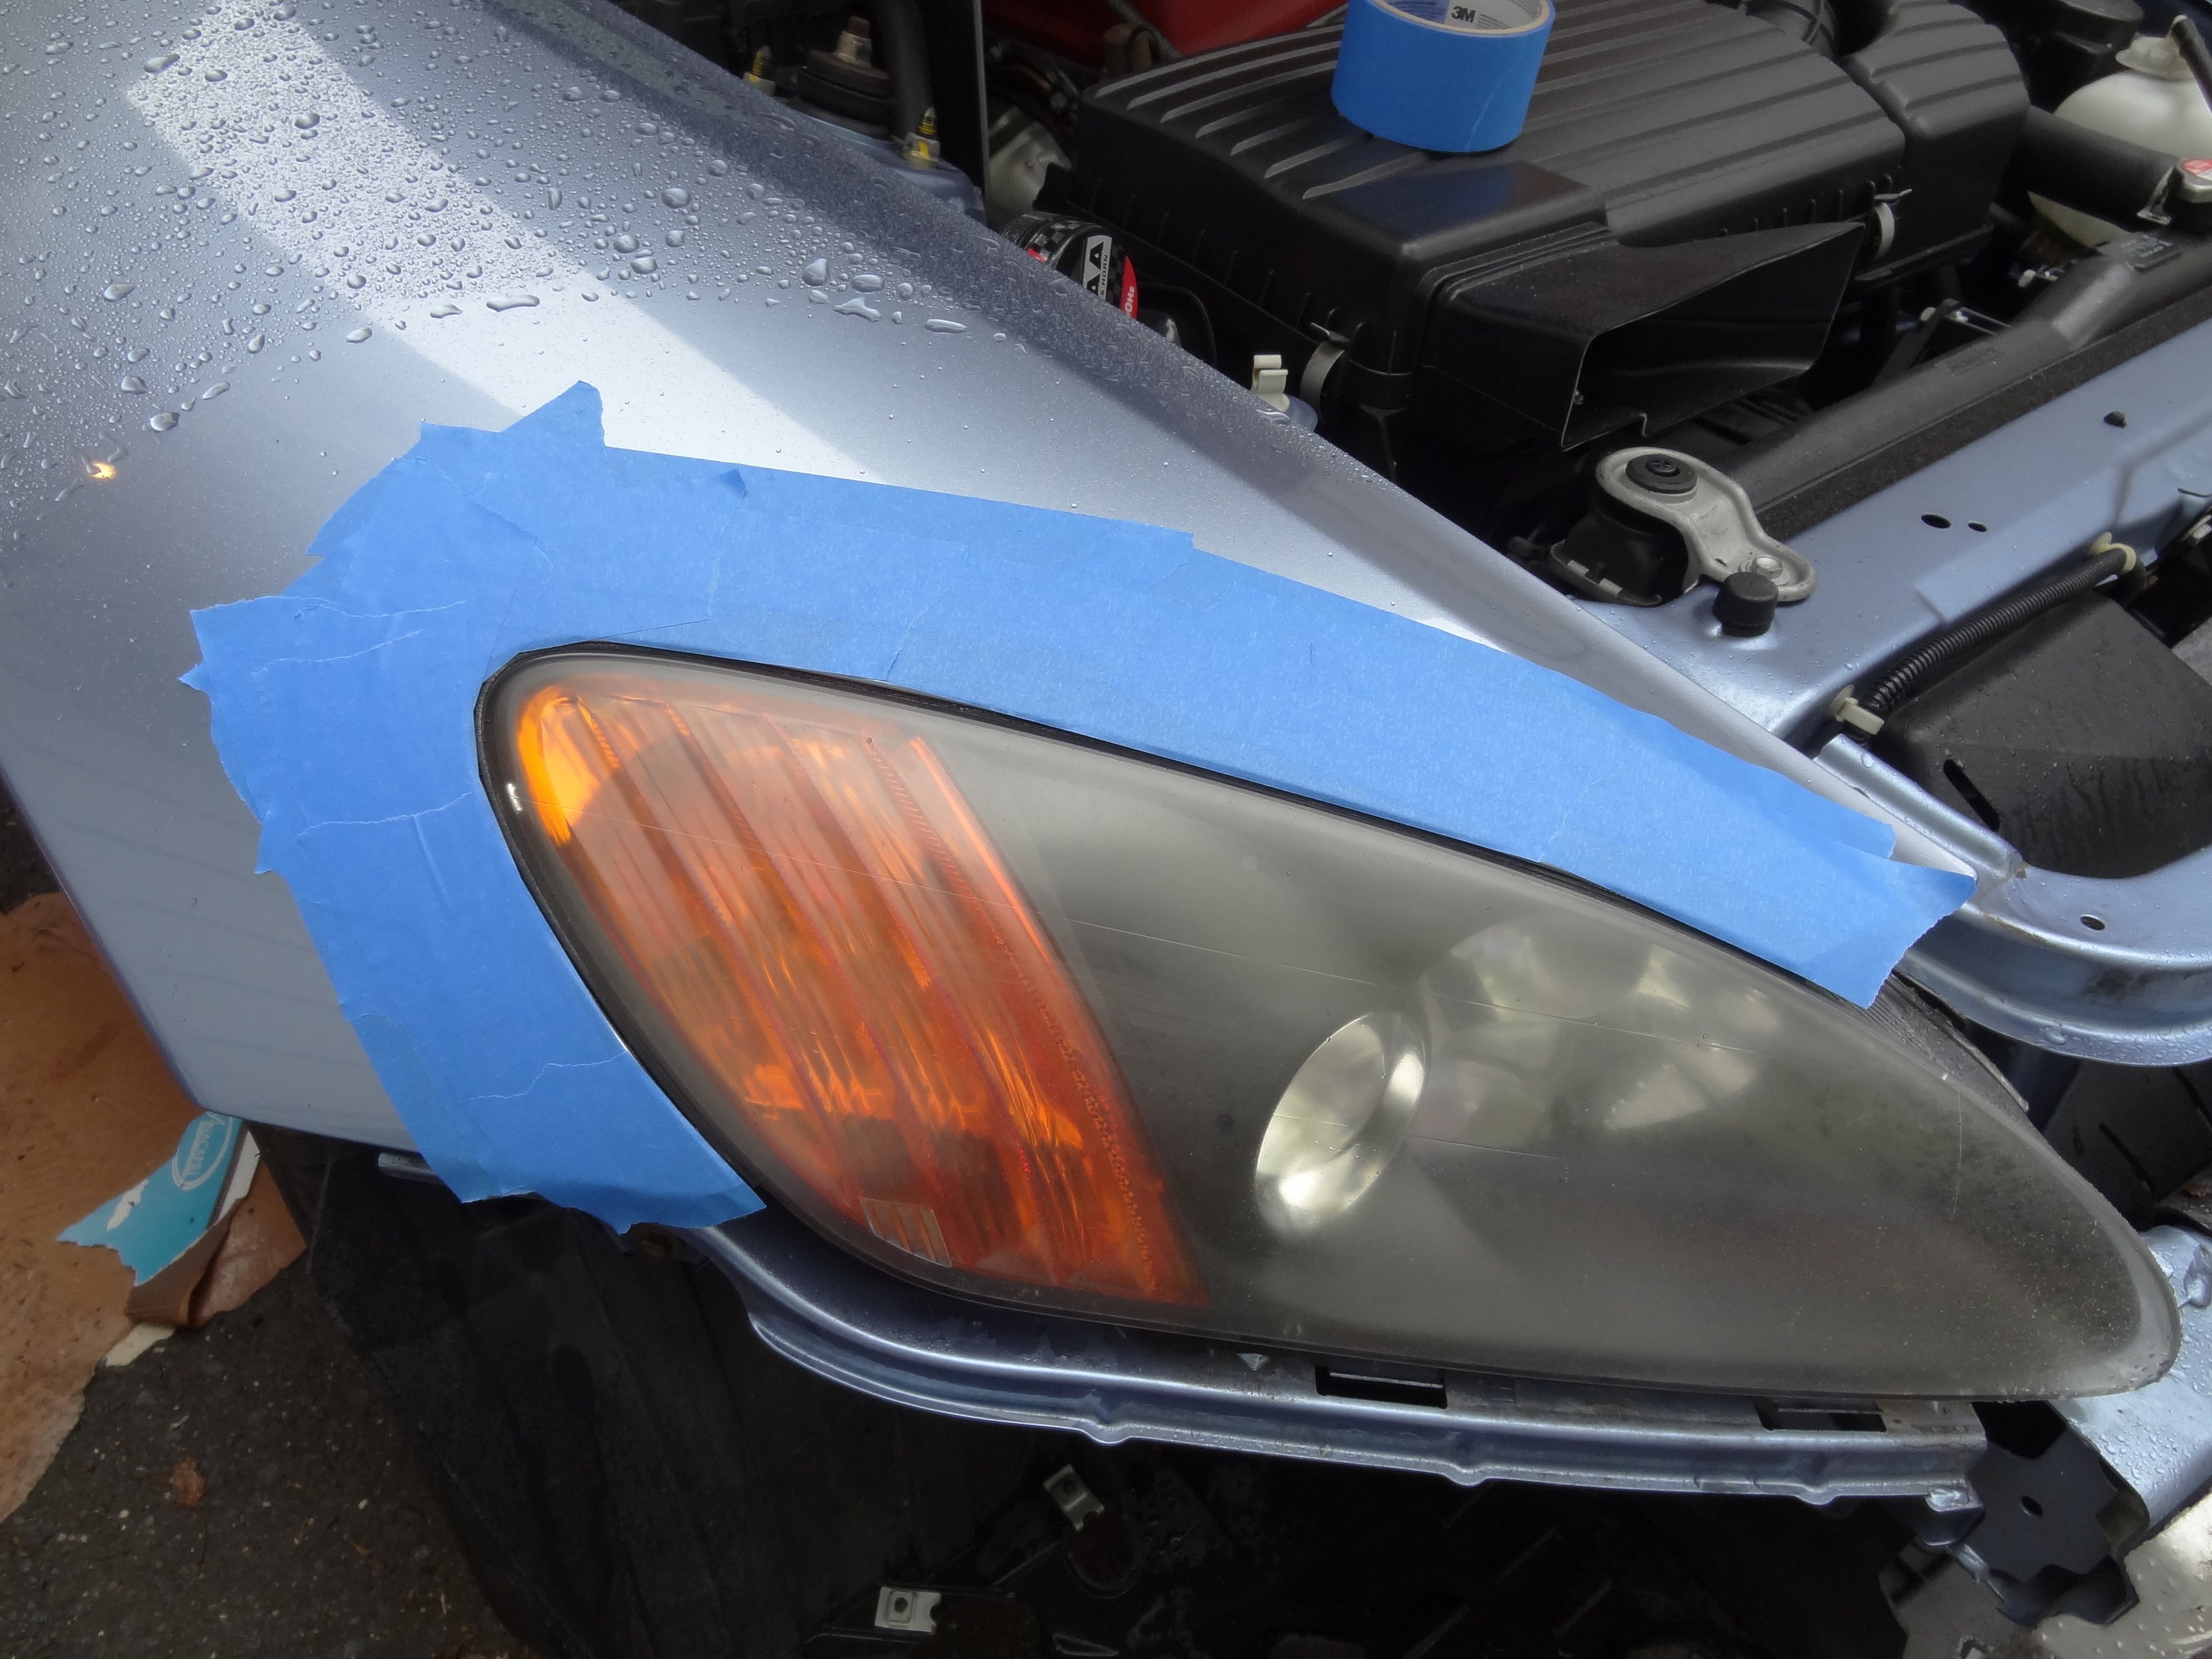
This is the third time I’ve done a headlight restoration, and it’s definitely a learning process: getting to know what to do, and what not to do. I put more care into this one, and it absolutely paid off. I did scuff the paint a bit over a few centimeters on the edge despite masking, and took a tiny bite out on the sharp corner next to the headlight.
I tried to make a time-lapse of the whole project, but I couldn’t find a surface with a good angle that my GoPro was willing to suction-cup hold onto, and I don’t have a tripod mount (yet), so you’ll have to settle for mostly stills.
I pulled the front bumper, because it juts out in front of the bottom edge of the lamp, and I knew I’d never get a good result with the bumper in the way. I also jacked the front of the car up; not necessary with the van, but a huge help to my back with the S2000. It also made reinstalling the bumper cover a lot easier.
Tips
Go slow, meaning thorough. Use all the sanding discs they give you. Wipe the surface frequently, and go over the parts you missed. Sand over both axes, up-down and left-right.
Overshoot rather than starting/stopping at the edges and corners, to avoid leaving circular swirls that will be difficult to polish off later in the process. If you see any, you can even them out before moving to the next step.
Verdict
This kit does a damn good job if you put in the time to do it well. I think it took me about 2 hours, including dropping and reinstalling the bumper cover. I have done the bumper before, so you may want to add some time for figuring that out on your car.
Before
After
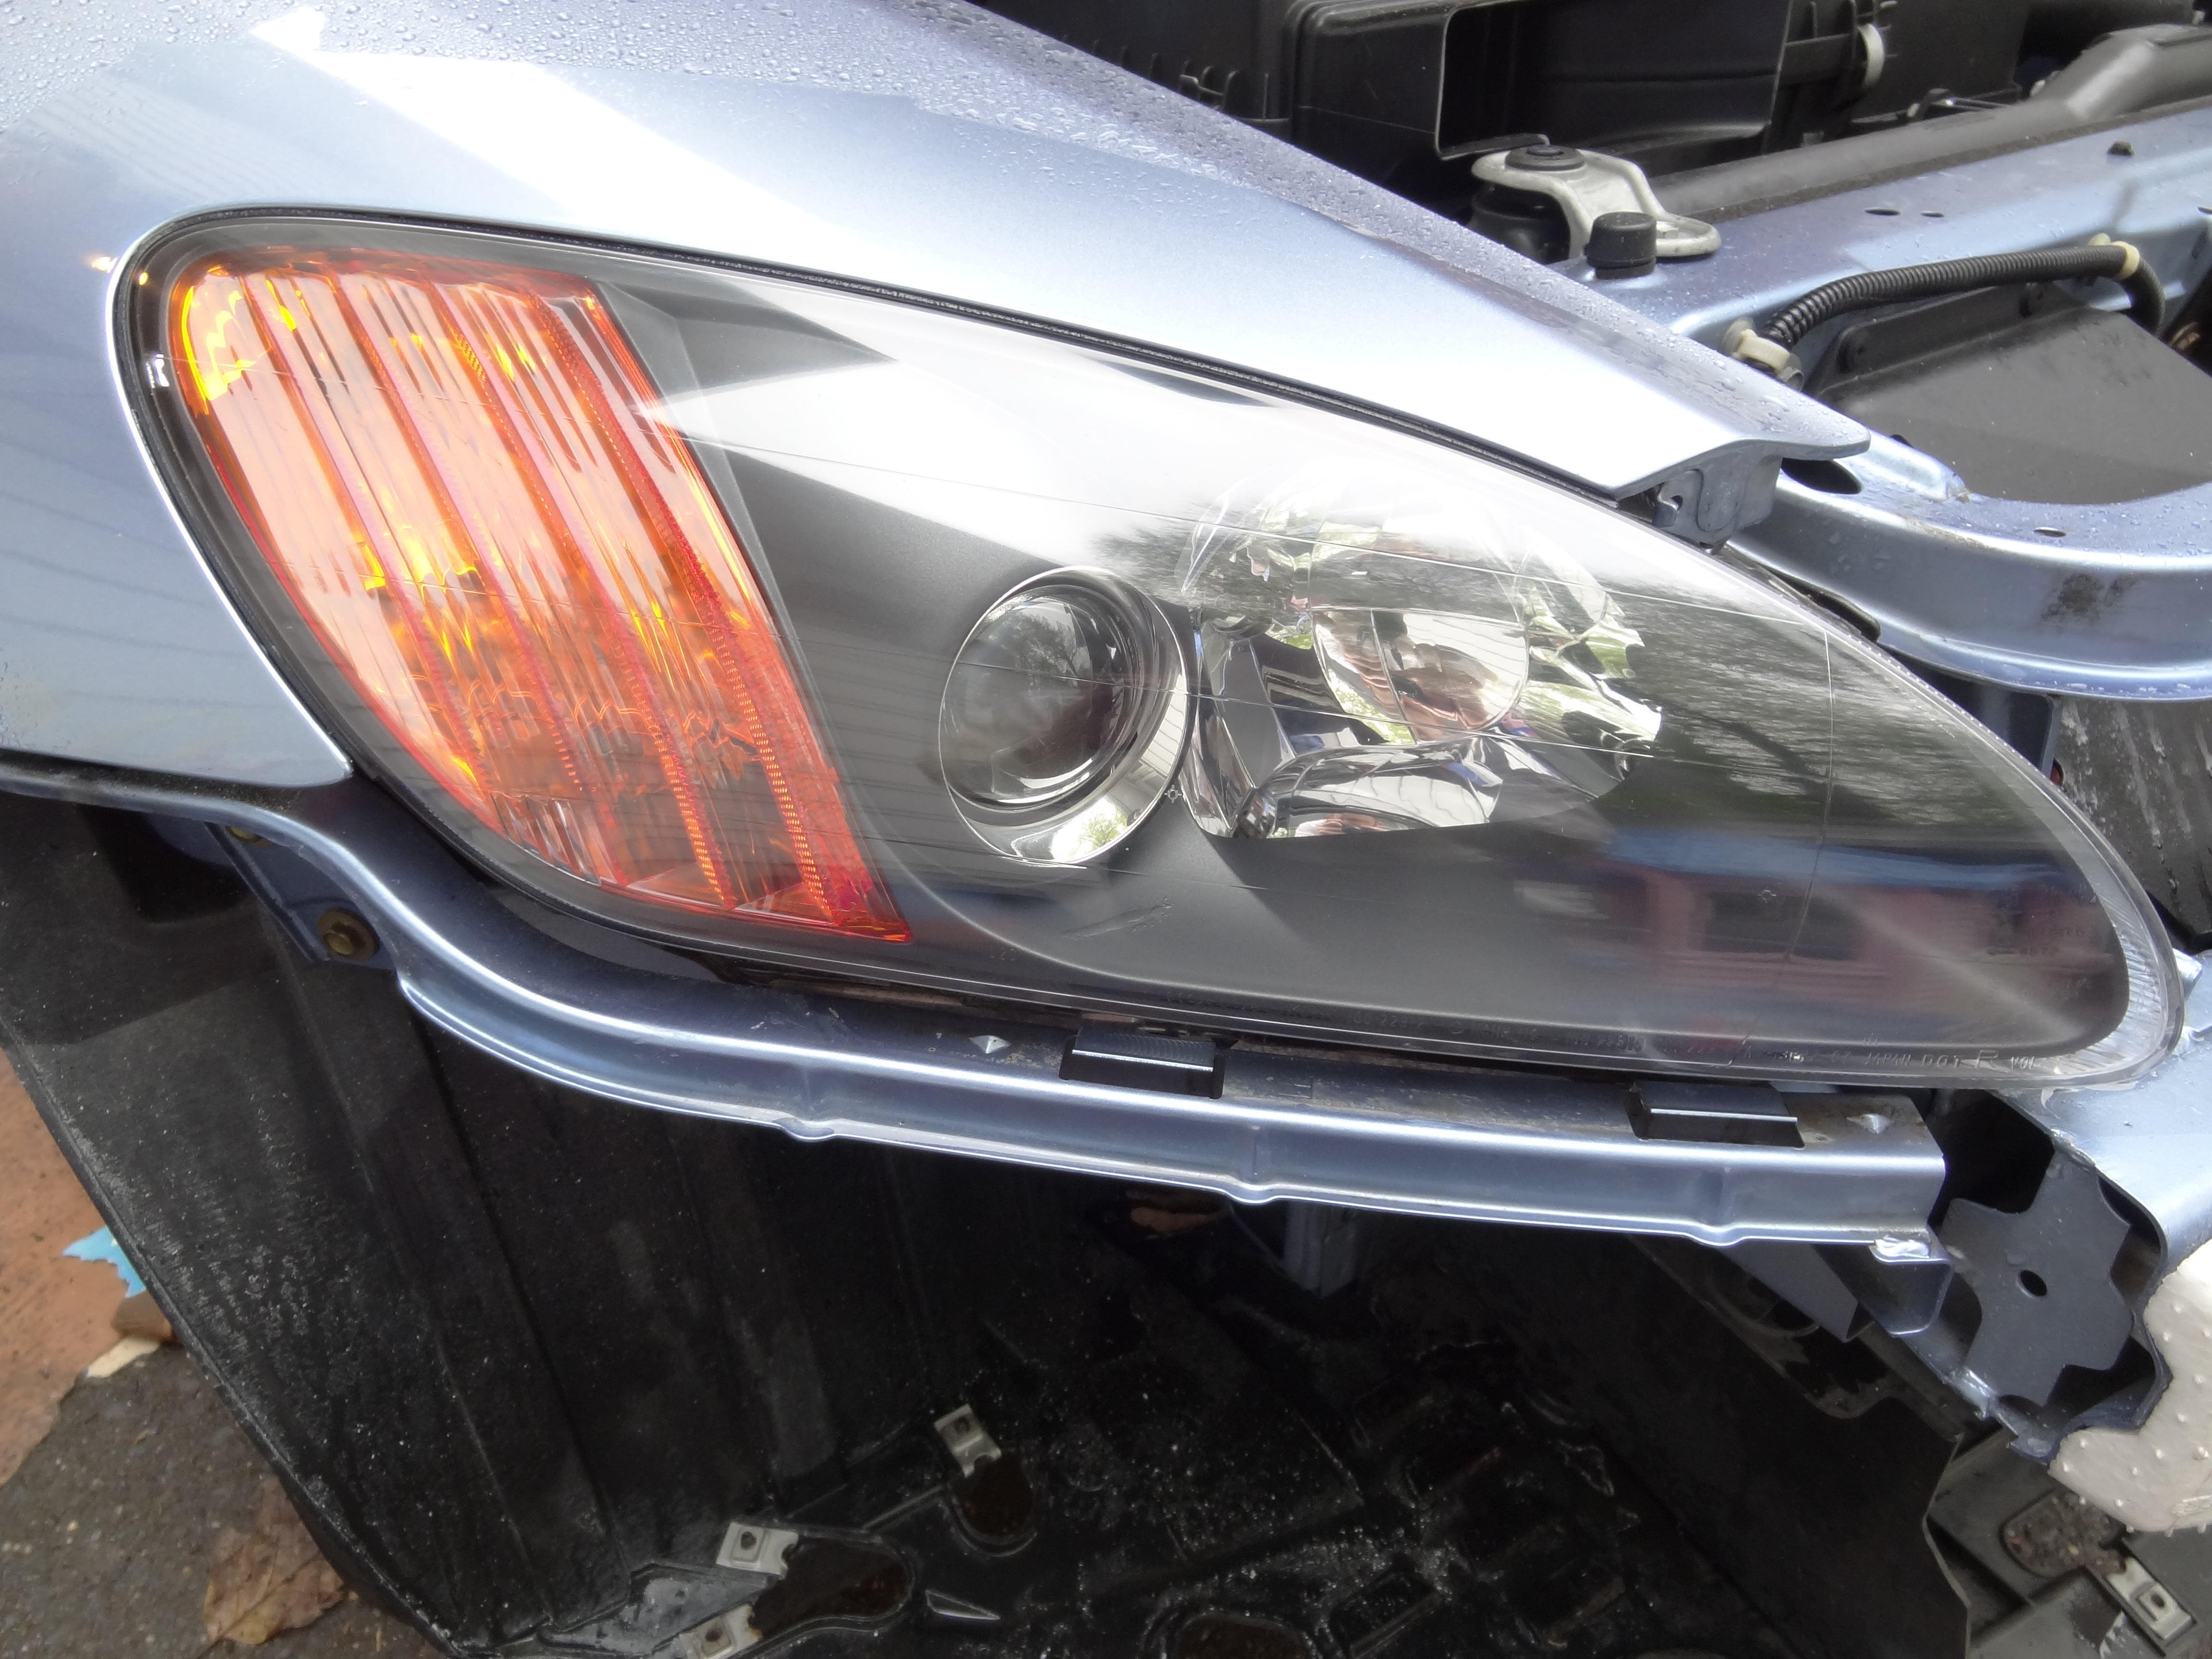
The deets
 BmanUltima's car still hasn't been fixed yet, he'll get on it tomorrow, honest.
> yitznewton
BmanUltima's car still hasn't been fixed yet, he'll get on it tomorrow, honest.
> yitznewton
05/02/2016 at 16:12 |
|
Would it make it easier to remove the entire assembly and clean them up off of the car?
 Daily Drives a Dragon - One Last Lap
> yitznewton
Daily Drives a Dragon - One Last Lap
> yitznewton
05/02/2016 at 16:14 |
|
I fully approve of the name you have chosen.
|
yitznewton
> BmanUltima's car still hasn't been fixed yet, he'll get on it tomorrow, honest.
05/02/2016 at 16:14 |
|
You’d have to figure out a way of securing the lamps without crushing them... I don’t have a vise, so it was a no-brainer for me to leave them in the car.
|
BmanUltima's car still hasn't been fixed yet, he'll get on it tomorrow, honest.
> yitznewton
05/02/2016 at 16:17 |
|
Good point. I was wanting to do this on my car. I think I could make a jig out of wood to hold it.
 ttyymmnn
> yitznewton
ttyymmnn
> yitznewton
05/02/2016 at 16:17 |
|
I’ve done this twice on my Odyssey, using this kit. I was pleased to see Edd China using the same kit on an episode of Wheeler Dealers. And I scuffed the paint, too. Next time, I’ll pop the hood, and maybe use a drop cloth to avoid getting polishing compound all over everything. Live and learn. It’s a little scary, though, since you make the headlights look a whole lot worse before you make them look better. But it’s really a pretty easy process.
http://oppositelock.kinja.com/todays-project…
|
yitznewton
> BmanUltima's car still hasn't been fixed yet, he'll get on it tomorrow, honest.
05/02/2016 at 16:18 |
|
That might work. These S2000 headlights are something like $800 apiece, so I didn’t want to try anything too creative :)
 Party-vi
> yitznewton
Party-vi
> yitznewton
05/02/2016 at 16:19 |
|
Times like this I enjoy my clip-on E46 headlight lenses.
|
yitznewton
> ttyymmnn
05/02/2016 at 16:21 |
|
Yeah, right? It’s like, “huh. ... Oh crap. ... OMIGOD ...” Rubbing compound, bling! And everything’s fine with the world.
I made an enormous mess of the compound when I did the van too, and was a lot more careful with avoiding excess this time, so it was minimal with the S2000.
 Rico
> yitznewton
Rico
> yitznewton
05/02/2016 at 16:26 |
|
Pretty dramatic before and after!
 MonkeePuzzle
> yitznewton
MonkeePuzzle
> yitznewton
05/02/2016 at 16:26 |
|
I tried to make a time-lapse of the whole project, but I couldn’t find a surface with a good angle that my GoPro was willing to suction-cup hold onto, and I don’t have a tripod mount (yet), so you’ll have to settle for mostly stills.
I used a tupperware container, filled it with water for weight and suction cup stuck to it’s smooth plastic lid
|
MonkeePuzzle
> ttyymmnn
05/02/2016 at 16:29 |
|
Next time, I’ll pop the hood
how the hell did I not think of that! storing that one away for the next time I do my headlights
 Funktheduck
> yitznewton
Funktheduck
> yitznewton
05/02/2016 at 16:30 |
|
I used the same kit on my Corolla shortly before I got rid of it. Couldn't believe I didn't try it sooner. Years of crappy lights gone with little effort
|
ttyymmnn
> MonkeePuzzle
05/02/2016 at 16:31 |
|
I did my Oddy, and my Golf, and didn’t pop the hood on either of them. It was very much a “dERp” moment when I realized that I could have done that.
|
BmanUltima's car still hasn't been fixed yet, he'll get on it tomorrow, honest.
> yitznewton
05/02/2016 at 16:31 |
|
Yeah, it’s crazy how much headlights cost. The ones on my E39 are about as much.
|
MonkeePuzzle
> ttyymmnn
05/02/2016 at 16:34 |
|
yeah, i’m feeling a bit the fool myself. I’m even recalling how I worked to slide the protective tape between the gaps.
|
ttyymmnn
> MonkeePuzzle
05/02/2016 at 16:36 |
|
You are not alone.
|
MonkeePuzzle
> MonkeePuzzle
05/02/2016 at 16:38 |
|
although, that said, one should make sure the adjestment on the mount itself is tightened, the first video was droopy
|
yitznewton
> Party-vi
05/02/2016 at 16:42 |
|
Or the sealed-beam units on my Mk1 Jetta
.....nah :)
That clip-on concept is pretty nice!
 DynamicWeight
> yitznewton
DynamicWeight
> yitznewton
05/02/2016 at 19:51 |
|
Good write up. I bought the maguiars kit from O’Rielly to surprise my girlfriend and it worked great! It uses drill attachments which make it really easy to use. The amount of light coming out of the headlights at night is dramatically different. It should really be considered a safety issue.
Also, I used the kit on her car, and my sisters car. Worked great for both and I’m planning on using it for my truck too. So you can definitely use the kits more than once.
 Nimbus The Legend - Riding on air like a cloud
> yitznewton
Nimbus The Legend - Riding on air like a cloud
> yitznewton
05/03/2016 at 15:28 |
|
nice result.
I did the headlights on my car by hand. wet sanded from low to high grit. but only on one axis, left to right.
then i used the meguiar’s polish pad and my drill with some plastic-x, and once everything had dryed, i put lamin-x film on them.